
This blog participates in affiliate programs. I may earn a small commission from qualifying purchases at zero extra cost to you. I only share tools and services I have personally tested.
If you want to build and test WordPress sites without paying for hosting, learning how to install WordPress locally with XAMPP is the perfect starting point.
Two years ago, a construction site accident left me with a broken right ankle — and put an end to decades of heavy physical work. My compensation case is still dragging through the courts, and the industry I built my whole career around is collapsing alongside the housing market.
At 50, I sent out over 100 job applications. I didn’t land a single interview.
I considered food delivery, but in a small city there aren’t enough orders to make it worth it — and honestly, my body can’t keep up with guys half my age.
Then I stumbled on affiliate marketing: no inventory, no customer service, just write honest recommendations and earn commissions. For the first time in a long time, something felt like a real path forward.
But there was one problem: I couldn’t afford to spend money on web hosting yet. What if it didn’t work out? A few hundred dollars down the drain was a risk I couldn’t take.
So I made a call: if I didn’t have money to spend, I’d invest time and effort instead. I decided to build WordPress locally with XAMPP first — a full practice site on my own computer, using 100% free tools.
Important note: A locally built site is only visible on your own computer. It will not be accessible to visitors on the internet. You will need web hosting to take it live later. The goal here is to learn, test, and prove the concept before spending any money.
In this guide, I’ll walk you through the exact step-by-step process I followed to set everything up locally — completely free.
Why I Recommend Building Locally First
Learning to build WordPress locally with XAMPP eliminates all upfront financial risk — and that’s a huge deal for beginners on a tight budget.
- Zero cost to learn and test: Try themes, plugins, page designs and full site structures without spending a single dollar.
- No pressure, no consequences: Break things, delete everything, and start over whenever you want. Nobody else can see your work in progress.
- Build confidence before going live: Once you prove to yourself that your site works and your content strategy makes sense, then you can invest in hosting with peace of mind.
For total beginners starting from zero, local development is the ideal low-stakes way to learn WordPress.
Before You Start: Avoid These 2 Common Mistakes
I learned these the hard way, so I’m putting them up front to save you hours of frustration.
- Never use spaces or non-English characters in folder paths.
D:\xamppworks perfectly.D:\my website fileswill cause random errors that are hard to debug. Stick to short, simple English folder names with no spaces. - Temporarily disable your antivirus software. Tools like Windows Defender, Norton and McAfee often block Apache and MySQL ports by default. You can turn protection back on after setup, but disable it during installation to avoid unnecessary headaches.
Step 1: Install XAMPP on Your Computer
XAMPP is the free software package that creates a “server environment” on your home computer, so WordPress can run locally.
- Go to the official Apache Friends website (search “XAMPP official download” and pick the Windows version). Always download from the official site — third-party sites often bundle unwanted software.
- Double-click the installer and click Next through the prompts. You can install it to the default C: drive or choose another location. Just make a note of where you install it.
- Leave all default components checked. There’s no need to change anything for a basic local setup.
- Wait for the installation to finish, then open the XAMPP Control Panel.
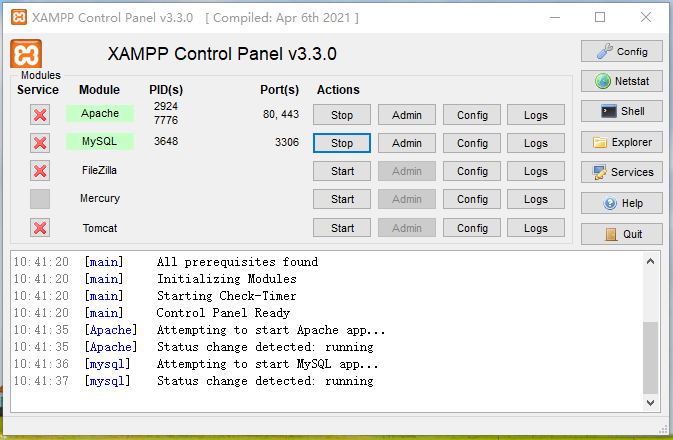
- Find the rows labeled Apache and MySQL. Click the Start button for both.
- When both show a green “Running” status, you’re ready to move on. Leave the default ports (80 and 3306) as they are.
I’ll be honest — when I first opened that control panel full of technical terms, I felt intimidated. Apache? MySQL? I had no idea what any of it meant. But then I realized: this is my private sandbox. Nobody is watching. If I mess up, I delete it and start over. it costs nothing. In this guide, I’ll show you exactly how to install WordPress locally with XAMPP — no hosting costs, no technical background required.
Step 2: Download WordPress and Place Files
Next, we’ll get the WordPress core files ready in your local server folder.
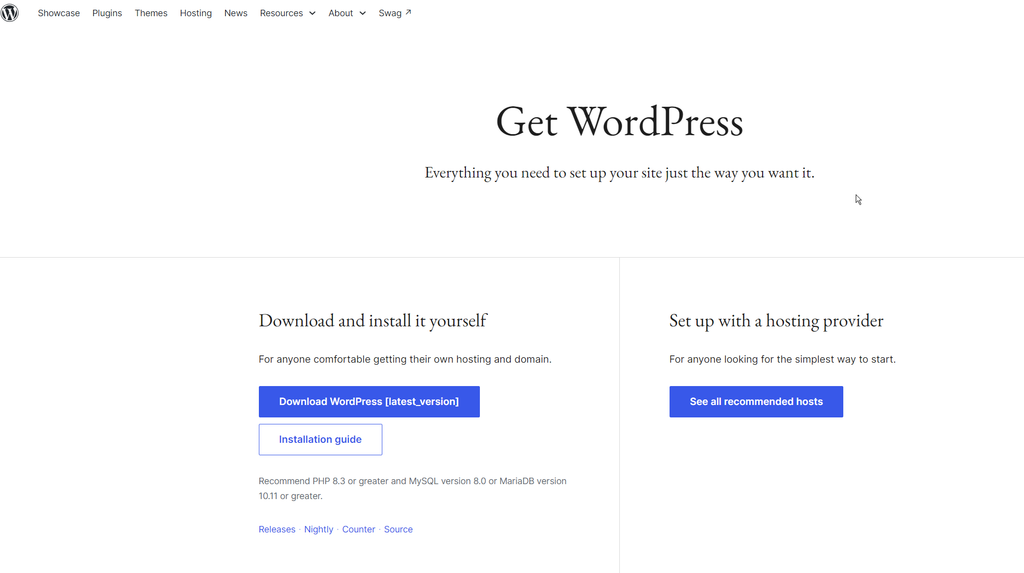
- Go to WordPress.org and download the latest free WordPress package.
- Navigate to your XAMPP installation folder, and open the
htdocsfolder inside it. This is where your local site files live. - Create a new folder inside
htdocs. Use a short, simple English name with no spaces — I called minereviewsite. - Unzip the entire WordPress package into your new folder.
Pro tip: Make sure you don’t end up with nested folders. The WordPress files (like
wp-config.php,wp-content, etc.) should go directly inside yourreviewsitefolder, not inside another subfolder.
Step 3: Create a MySQL Database
WordPress needs a database to store all your site content, settings and posts. We’ll create one now using phpMyAdmin.
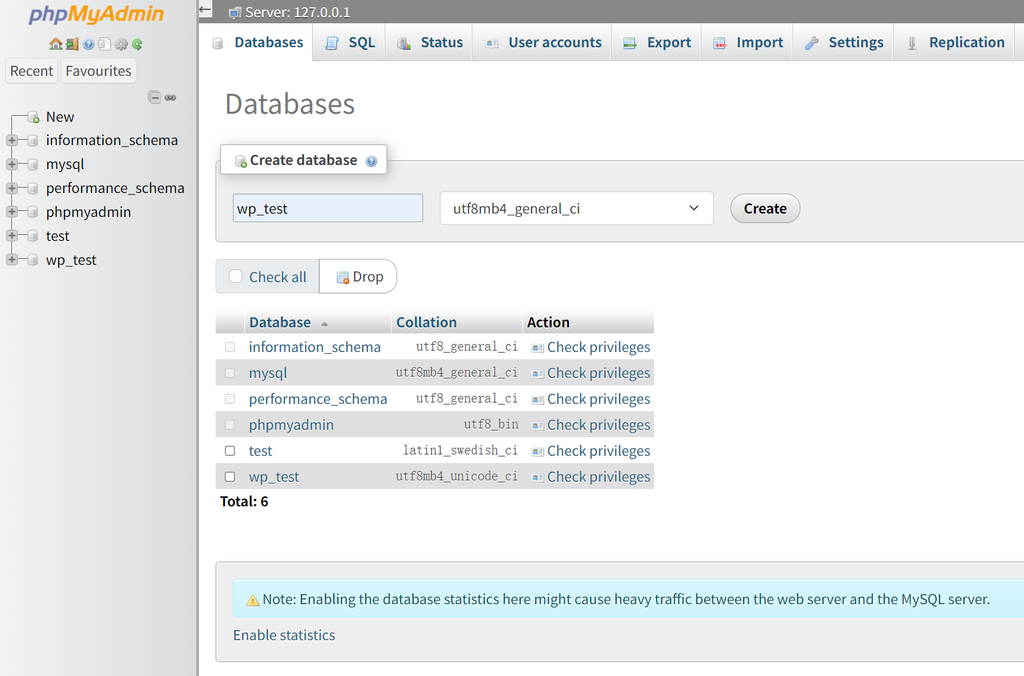
- Back in the XAMPP Control Panel, click the Admin button next to MySQL. This will open phpMyAdmin in your browser.
- Click New on the left sidebar.
- Name your database something simple like
wp_test. - Set the collation to
utf8mb4_unicode_ci(this supports all characters and emojis properly). - Click Create.
That’s it — you don’t need to add any tables or data manually. WordPress will handle that automatically during installation.
Step 4: Run the WordPress Installation
Now we’ll launch the famous WordPress 5-minute install process.
- In your browser address bar, type
http://localhost/your-folder-name(replaceyour-folder-namewith the folder you created in step 2, e.g.http://localhost/reviewsite) and press Enter. - You should see the WordPress installation screen. First, select your language.
- Next, fill in your database details:
- Database Name:
wp_test(or whatever name you used) - Username:
root - Password: leave this blank (this is the default for local XAMPP setups)
- Database Host:
localhost - Table Prefix: leave as default
wp_
- Database Name:
- Click Submit, then Run the installation.
- Now fill in your site information:
- Site Title: enter a temporary name for your blog (you can change this later)
- Username: pick an admin username (save this somewhere safe)
- Password: choose a strong password
- Email: enter an email address you check regularly
- Click Install WordPress.
When the WordPress dashboard appeared on my screen for the first time, I just sat there for a minute. After all that fumbling around, I had the skeleton of a real website — and it hadn’t cost me a single penny.
My affiliate marketing journey started right there — on a computer that wasn’t even connected to the internet.
Frequently Asked Questions
Can I build WordPress locally without buying hosting?
Yes. XAMPP lets you run a full WordPress site 100% free on your own computer. Keep in mind local sites are only accessible from your PC — you will need hosting to make it public later.
Do I need coding skills to use XAMPP and WordPress?
No advanced coding knowledge is required. Just follow the step-by-step instructions carefully, and you’ll be up and running.
What’s Next?
This is just the starting line. Now you have a fully functional local WordPress site to experiment with.
In upcoming articles, I’ll walk you through:
- How to choose and install a theme for an affiliate blog
- Must-have plugins for a new WordPress site
- How to move your local XAMPP site to live web hosting
- My first steps writing affiliate marketing content
If you’re also a total beginner trying to build an income online on a tight budget, follow along. I’m figuring this out one step at a time, and I’ll share everything I learn.