
Disclosure: This post contains affiliate links. If you click through and make a purchase, I may earn a commission at no extra cost to you. I only recommend tools I personally use and trust.
This step-by-step guide shows you exactly how to move WordPress from localhost to live server without breaking your site — and you can practice the whole workflow for free.
In my last post, I walked you through building your first WordPress site locally with XAMPP — completely free. If you followed along, you now have a working “bare-bones” website. But right now, only you can see it. It runs only on your own machine, and it’s still missing the basic pages, polish, and testing you need before you put it live for the world.
A lot of new beginners rush straight to web hosting. That’s a mistake. There are several important steps between “installed WordPress” and “ready to launch.” Skip them, and you’ll end up fixing problems after your site is already public.
This step-by-step guide shows you exactly how to move WordPress from localhost to live server without breaking your site — and you can practice the whole workflow for free, with zero hosting costs until you’re ready.
By the end of this guide, you’ll know exactly how to move WordPress from localhost to live server with zero downtime and no broken links.
What You’ll Learn in This Guide
- The 3 foundational WordPress settings to lock in first
- Which lightweight theme and 4 essential plugins you actually need (no bloat)
- 4 must-have trust & compliance pages for a legitimate affiliate site
- How to test your full publishing workflow locally
- The exact 5-click migration process to go live
- Common mistakes when learning how to move WordPress from localhost to live server and how to fix them fast
Step 1: Configure 3 Foundational Settings (Timezone, Permalinks & Language)
Before you move WordPress from localhost to a live server, there are 3 foundational settings you need to lock in first.
Don’t start installing themes or plugins yet. Get these three foundational settings right first, or you’ll create extra work for yourself later.
Log into your WordPress dashboard at http://localhost/yoursite/wp-admin using the admin account you created. Go to Settings → General.
Note: If you’re just practicing, you can switch the dashboard language to your preference. If you’re building an English affiliate site, leave the language set to English and choose the correct time zone for your target audience.
Timezone
This is easy to overlook, but it controls every post’s publish time. Get this wrong, and all your scheduled posts will go live at the wrong hour.
Permalinks (Critical for SEO)
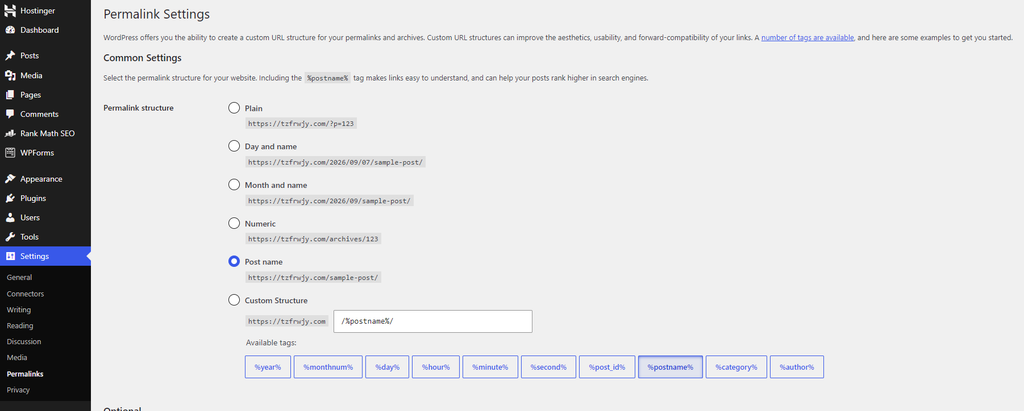
Go to Settings → Permalinks and select Post name.
By default, WordPress uses ugly numeric URLs. The “Post name” setting creates clean, readable URLs based on your article title — shorter, more memorable, and much better for SEO. Do this once now, and you won’t have to fix it later.
Step 2: Install 1 Lightweight Theme + 4 Must-Have Plugins
Now you can start building out your site. Themes control how your site looks. Plugins control what it can do.
Recommended Theme
I use and recommend GeneratePress. It’s lightweight, clean-coded, SEO-friendly, and perfect for affiliate blogs.
4 Essential Plugins
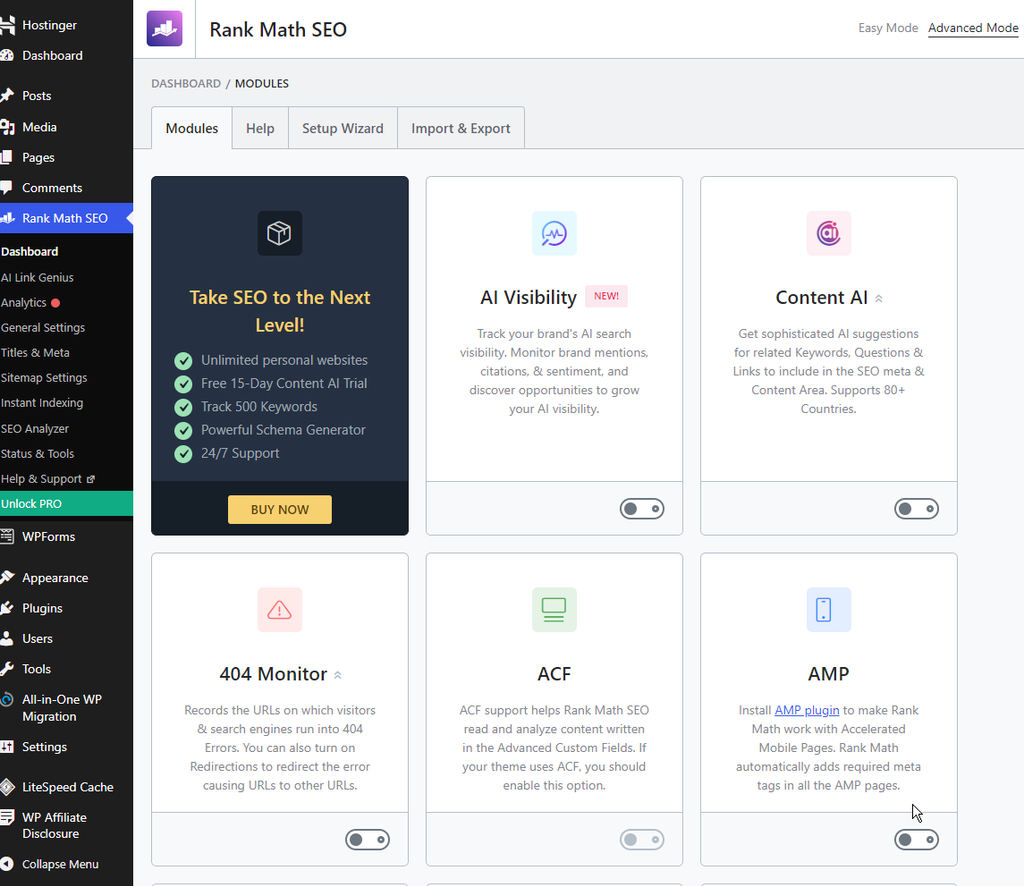
- Rank Math SEO – Helps you optimize every post’s title and meta description with a simple scoring system. It’s the plugin I use on all my own sites, and the free version covers everything a beginner needs.
- WPForms – Builds contact forms so visitors can reach you.
- LiteSpeed Cache – Speeds up your site through caching, which improves both user experience and SEO.
- All-in-One WP Migration – Moves your entire site from local to live hosting in a few clicks.
How to install: Go to Plugins → Add New, search for each name, click Install Now, then Activate. For themes, go to Appearance → Themes → Add New.
Step 3: Build 4 Trust & Compliance Pages Every Site Needs
For any legitimate website — and especially an affiliate site — these four pages are non-negotiable. They build trust with visitors and keep you compliant.
- About Us – Who you are and why you started this site
- Contact Us – How visitors can get in touch with you
- Privacy Policy – How you collect and handle visitor data
- Affiliate Disclosure – A full page explaining your affiliate relationship
Go to Pages → Add New to create each one, then publish them. When you’re done, go to Appearance → Menus and add all four pages to your main navigation bar.
Important: This full Affiliate Disclosure page is separate from the short disclosure notice at the top of each article. You need both for FTC compliance.
Step 4: Publish a Test Post & Run the Full Workflow
Don’t migrate your site yet. Publish one test article first to walk through the entire publishing workflow and catch issues early.
Go to Posts → Add New, paste in some test content, and add a title.
Make sure you test these three things:
- Insert a button (like “Check Service”) and use
#as a placeholder link. Practice the exact workflow you’ll use later for affiliate links. - Upload a test image and always fill in the Alt Text. It describes the image for search engines and appears if the image fails to load.
- Scroll down to the Rank Math SEO panel and optimize your title and meta description until you get a good score. If you skipped the plugin setup earlier, you can install it in one click through the official link.
When you’re done, click Preview. Check it on desktop AND on your phone. Most visitors read on mobile — you need to make sure the layout works, text is readable, and buttons are easy to tap before you learn how to move WordPress from localhost to live server.
Step 5: Pre-Launch Final Check
Once your test post looks good, run through this quick checklist before you go live with how to move WordPress from localhost to live server.Fixing issues locally is always easier than fixing them on a live site.
- ✅ Browse every page on mobile – check for broken layouts and overflowing text
- ✅ Click all four legal/compliance pages – confirm they load correctly
- ✅ Verify the affiliate disclosure appears on your test post
- ✅ Refresh the page multiple times – make sure it loads quickly
Warning: If a page takes more than 3 seconds to load, most visitors will leave. Don’t skip this test.
Step 6: Move WordPress From Localhost to Live Server
Now you’re ready to move WordPress from localhost to live server and officially launch your site to the public.
In this final step, you will move WordPress from localhost to live server using a simple migration plugin.
A local site is great for practice, but nobody else can see it. To make it public, you need to move it to a web host. This is the final step in the WordPress local to live migration process.
With All-in-One WP Migration, it takes 5 simple steps:
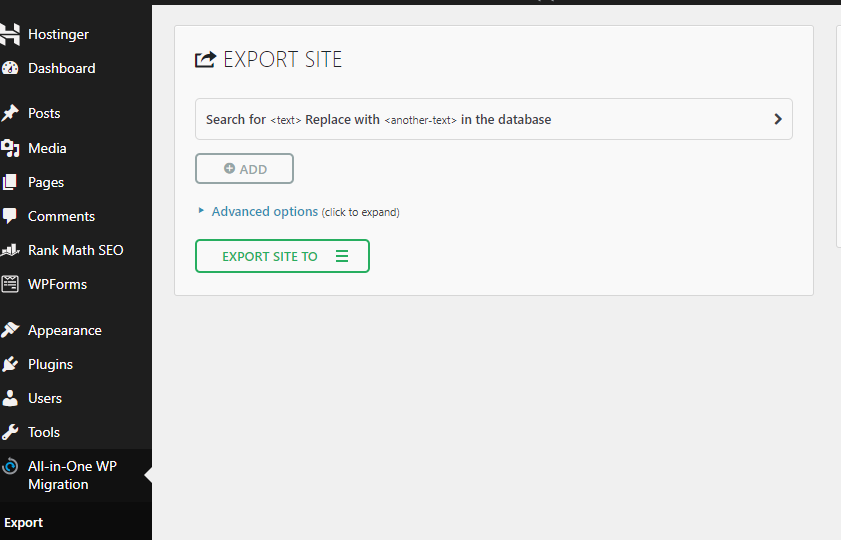
- In your local dashboard, open the plugin and click Export. Download the full site backup file.
Note: The free version of All-in-One WP Migration works for most small sites; larger sites may need the pro add-on for bigger file sizes.
- Buy a domain name and web hosting. For English affiliate sites, international hosts are recommended for speed and simplicity.
- Use your host’s one-click installer to set up a fresh, blank WordPress site.
- Install All-in-One WP Migration on the new live site, click Import, and upload your backup file.
- Go to Settings → General and update your site URL to your new domain name. Save changes.
Pro Tip: After you move WordPress from localhost to live server and update your site URLs, go to Settings → Permalinks and click Save Changes without making any edits. This fixes most common 404 errors after migration — a top mistake for new beginners.
As soon as you save, your website is live and accessible to anyone in the world. Following this 6-step workflow is the safest, most beginner-friendly way to move WordPress from localhost to live server without losing content or breaking your site
Frequently Asked Questions
Q: Will I lose any content when I move WordPress from localhost to live server?
A: No — when you move WordPress from localhost to live server, the migration plugin copies everything… — posts, pages, themes, plugins, and settings. Your live site will look identical to your local site.
Q: Do I have to use international web hosting?
A: If your target audience is overseas and your site is in English, yes — international hosts will give you better global speed. For domestic audiences, a local host works fine.
Q: Can I change my theme or add more plugins after going live?
A: Absolutely. You can make changes anytime. It’s just safer to test big changes locally first, then push them live.
Q: Can I learn how to move WordPress from localhost to live server for free?
A: Yes — you can practice the full workflow locally for free, and only pay for hosting when you’re ready to go live.
Q: Why do I get 404 errors after migrating WordPress?
A: This is a very common issue after you move WordPress from localhost to live server. Simply go to Settings → Permalinks in your live site and click Save Changes (no edits needed) to refresh rewrite rules.
Next Steps
Ready to build your local WordPress site first? Check out my complete guide: How to Install WordPress Locally with XAMPP (Step by Step)
Or see my picks for the best beginner web hosting to launch your first live site.If you want to dial in your SEO after going live, you can also grab Rank Math through this link for the full feature set.
By following these 6 steps, you can smoothly move WordPress from localhost to live server with zero prior experience.
Quick Recap Checklist
- Configure timezone, language, and permalinks
- Install GeneratePress theme + 4 essential plugins
- Create 4 core pages and add them to the main menu
- Publish a test post; preview on desktop and mobile
- Run through the pre-launch checklist
- Export, buy hosting, and migrate your site